 The original
version of this "how to" article, written about a year ago, included gems
like "save up money to live on for six months" and "quit your job." While this
advice may be applicable to the no-compromise high-performance long-range
solar bike project I'm still working on, it's pretty useless to the novice
who is just starting to think about how to "add some solar" to their electric
bike. Maybe you don't even have a bike but the thought of having a solar-charged
electric assist sounds like a good idea and you just need some tips on where
to get started and how much such a thing might cost. This article is for you.
The original
version of this "how to" article, written about a year ago, included gems
like "save up money to live on for six months" and "quit your job." While this
advice may be applicable to the no-compromise high-performance long-range
solar bike project I'm still working on, it's pretty useless to the novice
who is just starting to think about how to "add some solar" to their electric
bike. Maybe you don't even have a bike but the thought of having a solar-charged
electric assist sounds like a good idea and you just need some tips on where
to get started and how much such a thing might cost. This article is for you.
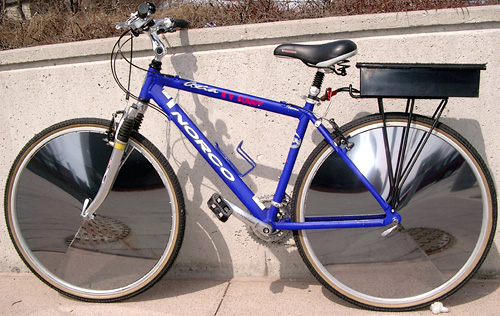
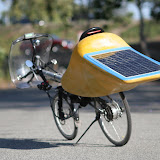
The recumbent bike with the yellow tailbox you see pictured to the left is still my main focus but I've recently completed a second bike to use when the recumbent is disassembled for repair or upgrades. The new bike is a traditional upright mountain bike with an Xtracycle conversion kit. I've installed a hub motor and used batteries I had lying around from an earlier project. The photos show some proposed solar panel mounting locations. This baby is perfect for hauling groceries and large packages. With a couple of optional accessories it can even haul a ladder or a surfboard.
The middle column below shows exactly what I built. The left and right columns are suggestions for how to build a less expensive version or a deluxe version to match your budget.
$Budget Version | $$My Version | $$$Deluxe Version | |
| Electric bike conversion | |||
| ~ US$ 500 | ~ US$ 1,300 | ~ US$ 1,800 | |
| Bike | $0 if you convert an older bike you already own or get donated for this project. A mountain or hybrid bike with 7 speeds or less in the rear is ideal but with sufficient determination and ingenuity almost any bicycle can be pressed into service. | $325 New Raleigh Mojave 3.0 mountain bike. I considered converting my trusty Surly Long Haul Trucker for this project but it had the wrong kind of handlebars (throttle wouldn't fit), wrong size cassette (8 speed instead of 7 max needed for the hub motor) and 700c wheels instead of 26" I wanted for good hill-climbing torque. I also considered a used bike on Craigslist but concerns about getting a stolen bike and time and money spent getting a lemon into shape lead me to a new entry-level mountain bike from my local bike shop. | $600 for a new mountain/hybrid bike with better quality components. Don't get a rear suspension if you're using the Xtracycle conversion and don't spend more than $600 to get a lighter bike since you're going to be adding motor and batteries which will make it heavy no matter how light the frame. Do spring for disc brakes because this baby will have a top speed over 30 mph and will weigh over 60 lbs plus rider. Sooner or later you will need to make an emergency stop and you will be glad you have disc brakes when that moment arrives. |
| Motor | $350 bargain kit on eBay including hub motor, wheel, motor controller, throttle, wiring accessories (compared with middle option: less power, lower top speed, less durable, no watt-hour meter to measure remaining range in batteries). See also Amped Bikes | $690 for 600W geared BMC V2-S hub motor kit including motor controller, throttle and Cycle Analyst watt-hour meter | $800 for 600W geared BMC V2-S hub motor kit including motor controller, throttle and Cycle Analyst watt-hour meter. This is price is my best guess. You may find a better deal. |
| Batteries | $100 36V 10Ah SLA (sealed lead acid) battery pack plus charger. Heavy and don't last long but they're cheap and recyclable. | $250 approx value of used LiFePO4 48V 10Ah battery I had from a previous project (bought new on eBay 2 years ago for $600) | $400 LiFePO4 48V 20Ah battery pack on eBay (August 2009 pricing) |
| Battery range | Up to 20 miles without pedalling (varies greatly by rider weight, speed and terrain) | Up to 30 miles with no hills, no pedalling, few stops, keeping speed under 15 mph | Up to 60 miles with no hills, no pedalling, few stops, keeping speed under 15 mph |
| Top speed | 15-20 mph | 34+ mph (California legal limit is 20 mph) | up to 40 mph with smooth high-pressure tires, flat, smooth road and rider weight under 180 lbs |
| Solar conversion | |||
| ~ US$ 200 | ~ US$ 850 | ~ US$ 1,700 | |
| Mounting rack | $100 for a heavy duty bike rack for mounting your batteries and solar panels. It should be rated for at least 50 lbs (~25 kg). | $450 Xtracycle FreeRadical/Longtail kit affords plenty of space for mounting 2 or 3 solar panels. I'm still working out the details of how to attach the panels. Check back in a few weeks for updates. | $750 Xtracycle conversion including FreeRadical/Longtail kit plus KickBack stand, WideLoader and LongLoader accessories for carrying passengers and large loads with greater ease |
| Solar panels | $100 for suggested minimum 30 watts at $3/watt on eBay. Good for 10-15 solar miles/day in the summer. Selecting solar panels for your bike. | $300 approximate value of prototype solar panels I acquired under special circumstances (I work in the solar industry) | $777 for three 24 watt SunWize Sol-Charger modules for a solar range of 30+ miles/day in the summer |
| Charge controller | Not needed if you use SLA batteries and several small solar panels wired in series and facing the same way. For example three 12V 10 watt solar panels can be wired in series to get 36V and connected directly to a 36V SLA battery pack. It's not ideal but it works and it's cheaper than getting a charge controller. | $100 Solar Converters CV 12/24-2PV solar charge controller. Takes nominal 12V solar input (up to about 20V) and delivers optimal charging voltage for 24V SLA battery pack (CC/CV, tapering off to 28.8V). Limited to 2 amps. This isn't ideal for LiFePO4 batteries but it seems to work just fine. | $200 Solar Converters 5 amp 12V input, 36V output charge controller. They have a model with an adjustable output voltage which may be a better choice for your expensive LiFePO4 battery pack. |
| Not included: Mounting hardware for solar panels and batteries. | |||
How to do it even cheaper?
Walmart and Target sell electric bikes starting at US$300. That price includes the bike, motor and battery. If you are considering a bike in this price range think about the compromises in quality that had to be made to get the price so low.
If you think my budget version above is still too expensive and you have access to junk yard parts and a well-equipped workshop, you may consider building your own electric bike from scratch. Using old bicycle parts and almost any 200 to 1000 watt DC motor, a moderately skilled Jack or Jane of all trades with ample determination can build an electric bike on a shoestring budget. Batteries can be re-purposed from just about any source - old cordless tools, backup power supplies for computers, slightly used SLA's from medical equipment, even old car batteries may be enough to get you started and can fuel your enthusiasm until you save up for a proper LiFePO4 battery pack and charger.
The only item on the list that doesn't have a free or cheap alternative are the solar panels. I don't know of any sources for used solar panels. Here in California, they are phasing out the old emergency roadside call boxes so maybe you can find if the old solar panels from these call boxes are being sold at auction somewhere? Searching for used solar panels on eBay yielded a handful of scam auctions trying to sell used panels for $5 or more per watt. Keep in mind that you can get new panels on eBay for less than $3 per watt.
Original post (April 2008)
- Save up enough money to live on for at least 6 months. It is important that you do this before you proceed to step 2.
- Quit your job or arrange to take an extended sabbatical leave. You won't have time for your job once this project gets under way. You did follow step 1 first, right?
- Next, you'll need to decide between an old fashioned safety bicycle and a recumbent bicycle.
- Select a motor and battery. I use the Electro-Portal E-4 kit but there are lots of other options available. You will need a battery to store the energy produced by your panels when you're not using the motor, such as when you're stopped or when you're going downhill or just pedaling on a straight stretch of road. The battery will also provide the extra bursts of power you'll want when you're climbing a hill or starting from a dead stop. Start with an inexpensive SLA (sealed lead-acid) battery and upgrade to a lighter, longer-lasting LiFePO4 battery later on. The initial cost is higher but they last longer so the life-cycle cost is the same or even lower.
- You're going to have to design and build your own panels. Standard rooftop solar modules are designed to withstand impact by 1 inch hail at 50 mph, not to mention 30+ years of wind, sun and rain. They have to be very tough and durable to survive the extreme environments in which they're used. This is accomplished by framing the module with tempered glass and aluminum. These materials are heavy and don't belong on a bicycle. You may also be tempted by light, flexible thin-film solar modules. They can be rolled up and are virtually unbreakable but they suffer from a low efficiency, meaning your panel would need to be twice as big to get the same amount of power. Since you want to get the most power possible from the smallest panel possible, you're going to need to build your own panel from scratch. Given enough time and patience, anyone can build a solar panel. I didn't know anything about solar power when I started. You should start by purchasing this DIY solar guide from Stephan Hughes. Stephan is a great resource for do-it-yourselfers. [Update: May 20, 2008 - Stephan's eBay store appears to be offline. My email asking about this change has gone unanswered. Contact me via the comment link below if you're looking for resources for building your own panel.]
- Start a blog and tell the whole world about your crazy adventure.
 The safety bicycle was invented in 1885 by John Starley and hasn't changed much since. The "safety" part refers to the improvement it represented when compared with the penny-farthing bicycles that preceded it. It doesn't offer much opportunity to add large solar panels so you'll be limited to a 20-30 watt panel or about 10-15 solar miles per day of charging in the sun. You may be able to bring that figure up to 50-75 watts if you add a trailer. The advantage of this approach is that you can leave the trailer at home on cloudy days.
 The recumbent holds every world record for human powered travel in terms of distance and speed (over 80 mph) thanks to it's efficient design. More importantly, it will allow you to mount 100-150 watts of solar panels directly on the bike. Based on my road tests, this would give you 40-60 solar miles per day in the summer. If you design your panels as front and rear fairings, you can actually improve the aerodynamics of your bike and help offset some of the added weight.
